Node.js Readable Streams: Modes, Buffers, and Backpressure
The shared stream vocabulary is covered in Stream Foundations. Once readable chunks need filtering, parsing, compression, or reshaping before they reach a destination, the model continues in Transform Streams.
What a Readable Stream Is
The readable-side state machine is what gives stream APIs their shape. highWaterMark defines the buffer threshold that controls how eagerly the stream asks the source for more chunks. readable.pause() changes how chunks are consumed. It stops automatic data event delivery, while buffered data and source reads still follow the same internal rules.
Readable streams may look like a nicer wrapper around files or network connections but, to use them well, you need to understand the readable-side model - how chunks are buffered, how the stream communicates with consumers, and when it asks the source for more data.
The rest of this chapter builds that model through the Readable class, its options and events, the mode changes that control consumption, the internal queue behind highWaterMark, and the patterns for implementing and consuming streams safely.
The Readable Stream Class
A Readable object is both a stream state machine and an event emitter. Importing Readable from node:stream gives you a class that extends EventEmitter, and that inheritance shapes how the stream talks to user code.
A Readable stream reports its lifecycle through events such as data, end, error, readable, and close. Its buffering behavior is controlled through options and methods.
Most application code receives Readable streams from APIs such as fs.createReadStream() or http.IncomingMessage instead of creating them directly. When code does create one, either by extending the class or by passing options to new Readable(options), that configuration defines how the stream buffers data, what type of chunks it produces, and how cleanup runs.
The option you will see most often is highWaterMark. It is the buffer threshold, measured in bytes or objects depending on objectMode, that tells the stream when to stop asking its source for more data.
It is not a hard memory limit. A single chunk can be larger than the threshold, and a custom stream can exceed it if the implementation ignores the return value of push().
In current Node.js LTS releases, the generic stream default is 65536 bytes, or 64 KiB. Older releases used smaller generic stream defaults, so treat exact defaults as version-specific in long-lived documentation or libraries.
The threshold works because a Readable stream keeps an internal queue between the source and the consumer. When the consumer is ready, chunks leave the queue. When the queue runs low, the stream asks the underlying source to refill it. Once the internal queue reaches or exceeds highWaterMark, Node stops calling the stream's _read() method until buffered data is consumed.
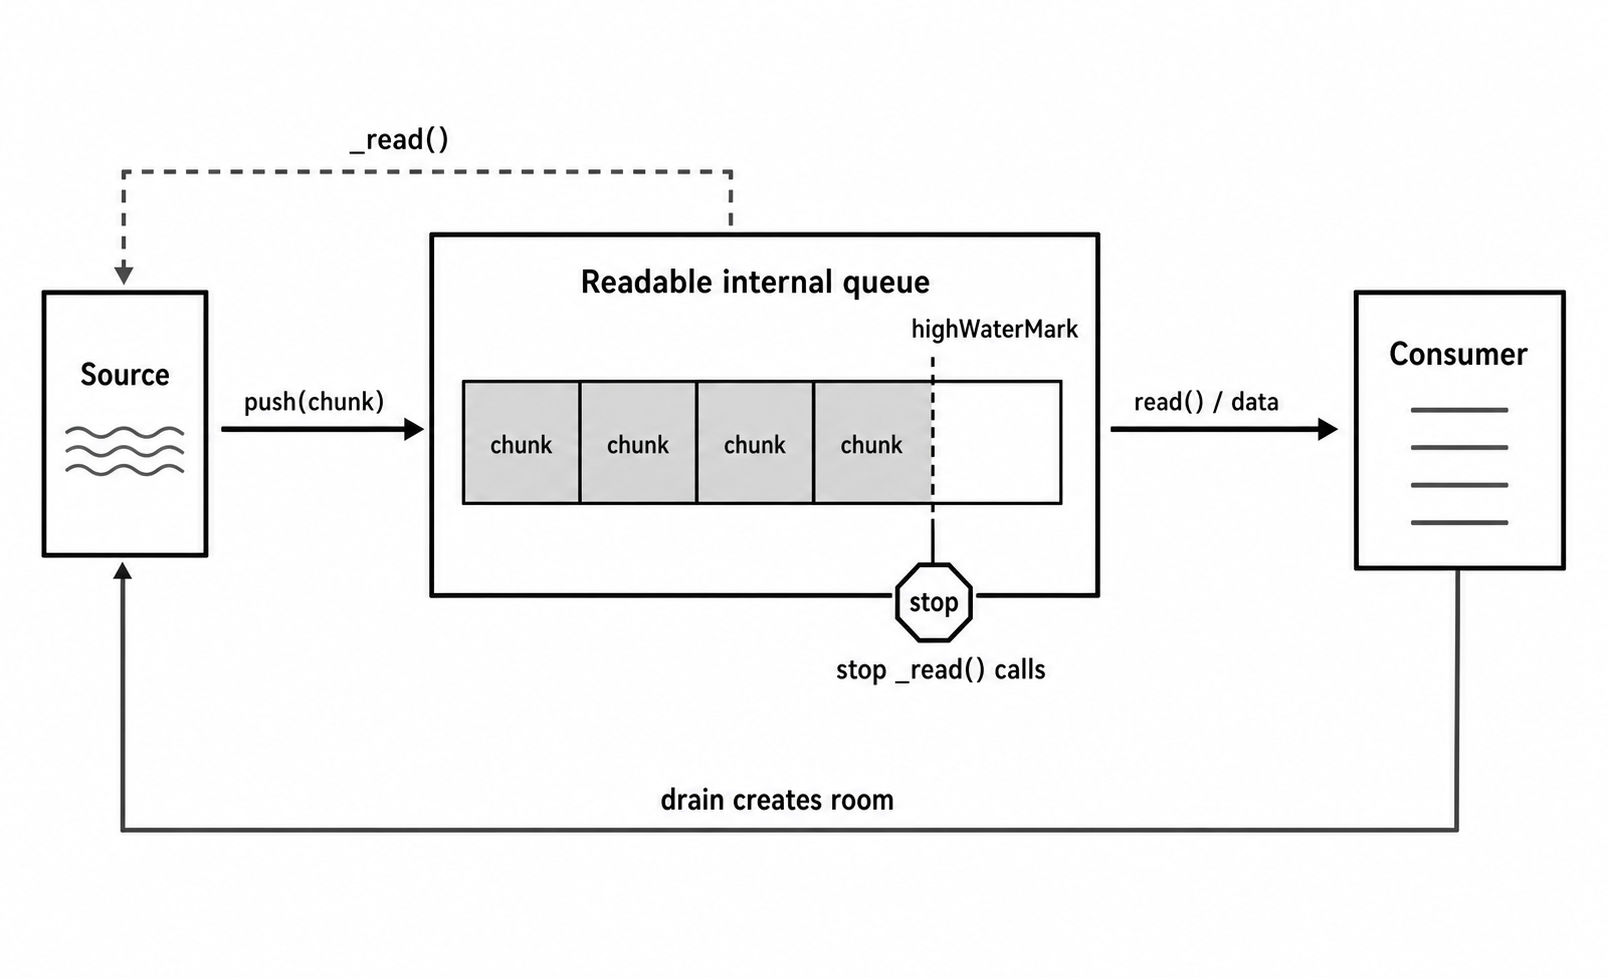
Figure 1 - A Readable stream keeps chunks in a queue between the source and the consumer. When the queue reaches highWaterMark, the stream stops asking the source for more until buffered data is consumed.
The configuration looks like this -
import { Readable } from "node:stream";

const readable = new Readable({
  highWaterMark: 1024, // 1 KiB buffer
  read() {},
});
This stream has a 1 KiB buffer threshold. If its _read() implementation respects the size hint and stops when push() returns false, it avoids reading too far ahead of the consumer.
Another option changes the unit being buffered. By default, Readable streams work with Buffer objects and strings. Setting objectMode: true makes the stream buffer arbitrary JavaScript values instead. In that mode, highWaterMark is an object count instead of a byte count, and the default is 16 objects.
const objectStream = new Readable({
  objectMode: true,
  highWaterMark: 100, // buffer up to 100 objects
  read() {},
});
That setting fits pipelines built around structured records. A stream that reads database rows and sends them through transform stages can keep each row as one stream chunk instead of converting it to a buffer and parsing it back into an object later.
The encoding option changes the value the consumer receives. By default, byte-mode Readable streams emit Buffer objects. With an encoding such as "utf8", the stream converts those buffers to strings before the consumer receives them. Calling buffer.toString("utf8") manually is possible, but setting the option keeps text-only consumers simpler.
const textStream = new Readable({
  encoding: "utf8",
  read() {
    this.push(Buffer.from("hello"));
    this.push(null);
  },
});
When this stream emits data, the consumer receives strings.
Other options fill in the rest of the lifecycle. read can provide reading logic inline, destroy can provide cleanup logic, and autoDestroy controls whether the stream destroys itself after ending. In day-to-day code, though, highWaterMark, objectMode, and encoding are the options that most directly shape how data is buffered and what type of value leaves the stream.
Events
After configuration, events are the main way a Readable stream communicates with user code. The core events are data, end, error, readable, and close.
The data event belongs to flowing mode. When a Readable stream is flowing, it emits data events whenever chunks are available. Each event carries one chunk - a Buffer, a string if encoding is set, or an object if objectMode is true.
readable.on("data", (chunk) => {
  console.log(`Received ${chunk.length} bytes`);
});
For byte streams, chunk.length is a byte count. In object mode, each chunk can be any JavaScript value, so the meaning of length depends on the object itself.
Attaching a data listener is also a state change. It switches the stream into flowing mode, so available chunks are pushed to the listener without explicit read() calls.
The end event fires when the stream has no more data to provide. The underlying source has been fully consumed. A file reader has reached EOF, or an HTTP response has finished sending its body. The event has no arguments. It is only the readable side's completion signal.
readable.on("end", () => {
  console.log("No more data");
});
The error event carries failures from the source or from the stream implementation. A file read may fail, a network connection may drop, or custom source code may reject an operation. When that happens, the stream emits error with the error object.
If no error listener is attached, Node throws the error, which can crash the process. Stream consumers should attach an error handler.
readable.on("error", (err) => {
  console.error("Stream error", err);
});
The readable event belongs to the pull-based side of the API. It fires when data is available in the internal buffer and is most useful when the consumer calls read() explicitly.
readable.on("readable", () => {
  let chunk;
  while ((chunk = readable.read()) !== null) {
    console.log(`Read ${chunk.length} bytes`);
  }
});
Here, the event tells the handler that a read may succeed. The loop pulls chunks from the internal buffer until read() returns null, which means no complete chunk is currently available. This is the pull-based version of the push-based data event.
The close event is separate from readable completion. end means no more data will be produced. close means the stream and its underlying resources have been closed. Many streams emit close, so listen for it when cleanup timing needs to be visible.
Together, these events show how the stream moves from buffered data to consumed data, from success to failure, and from logical completion to resource cleanup. The next piece is the consumption mode that decides how chunks leave the buffer.
Flowing Mode and Paused Mode
Operating modes control when buffered data leaves the Readable stream. The public model has two consumption modes - flowing mode and paused mode. Under that model, the readable.readableFlowing property has three possible values - null, false, and true.
A newly created stream starts at null, which means no consumer has been attached yet.
When readableFlowing === false, the stream is in paused mode. It can still collect data in its internal buffer, but it does not emit chunks automatically through data events. The consumer must call readable.read() to pull data from the buffer.
When readableFlowing === true, the stream is in flowing mode. As soon as data is available, the stream emits data events. The consumer does not call read() for each chunk. The stream pushes chunks outward.
Both modes exist because consumers need different kinds of control. Flowing mode is convenient when processing can keep up with the source and the code can handle chunks as they arrive. Paused mode is better when the consumer needs to choose exactly when to pull, such as when parsing a protocol or coordinating with asynchronous work.
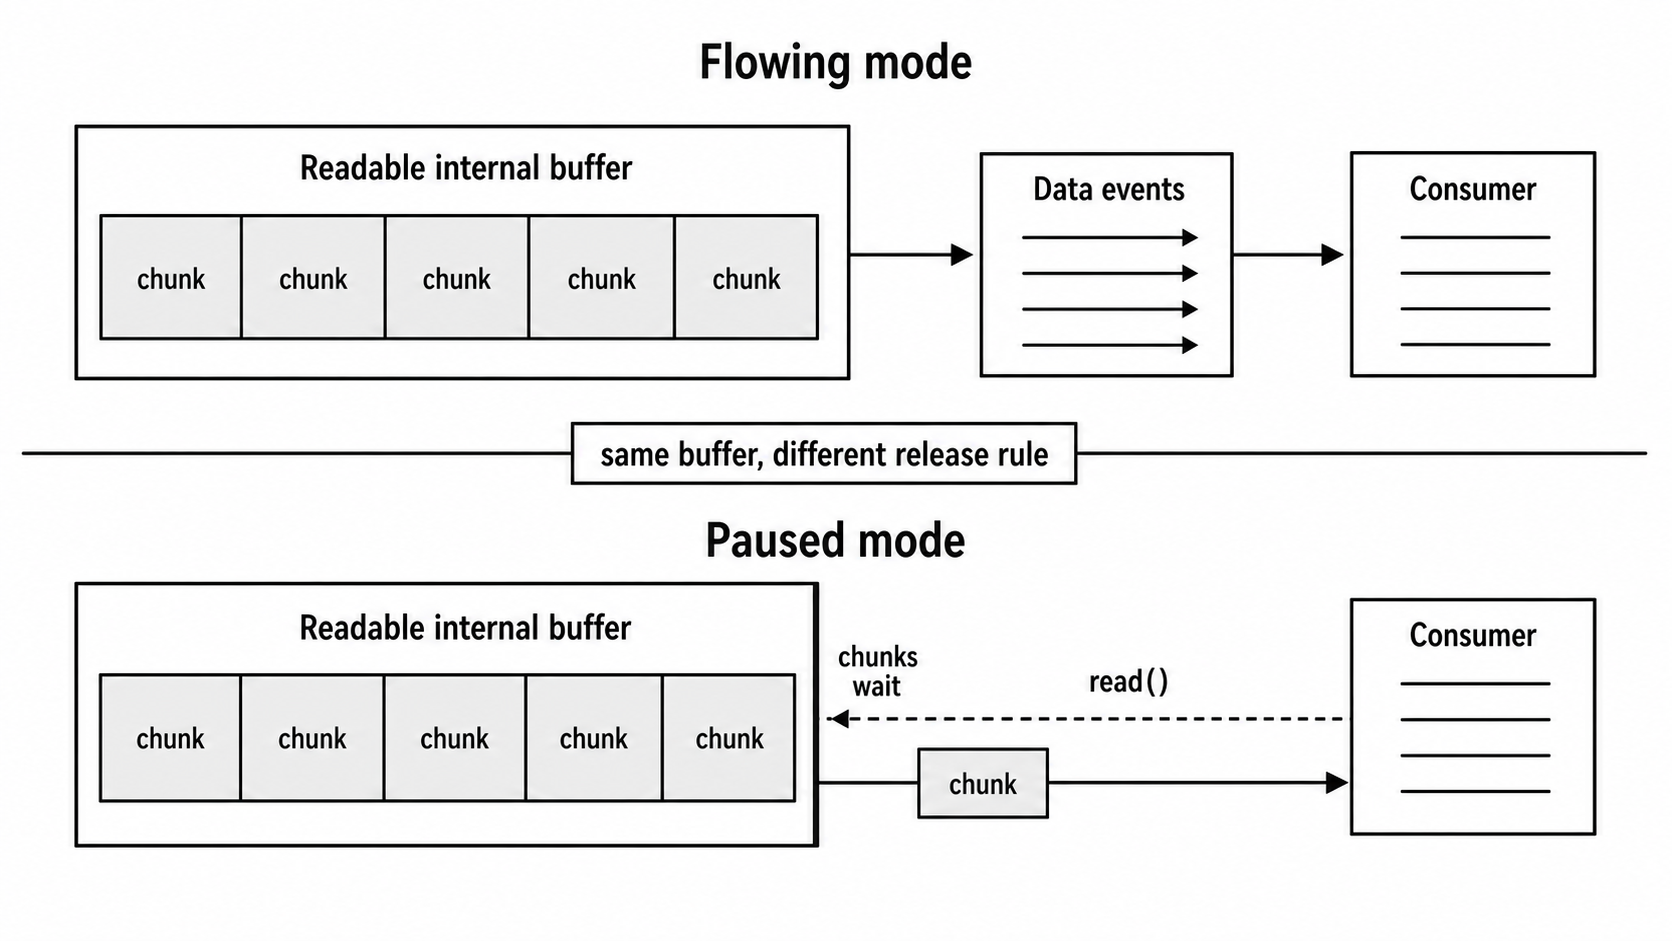
Figure 2 - In flowing mode, available chunks move outward automatically. In paused mode, chunks remain buffered until the consumer explicitly pulls them with read().
The initial null state changes as soon as a consumption mechanism is attached. These actions switch a stream to flowing mode -
- Attaching a
dataevent listener - Calling the
resume()method - Calling the
pipe()method to pipe the stream to a Writable stream
You can switch from flowing mode back to paused mode with pause() when there are no pipe() destinations. Once the stream is piped, flow control belongs to the pipe chain and to destination backpressure. A manual pause() call does not guarantee the stream will remain paused after a destination drains and requests more data.
That difference is easy to miss. pipe() is a higher-level API that coordinates the Readable with the Writable. It pauses and resumes based on the Writable stream's write() and drain behavior, so manual pause() and resume() calls are no longer the clean place to manage pressure.
The next two snippets use placeholder getReadableStream() and processChunk() functions so the examples can focus on the mode. Paused-mode consumption waits for the readable event and then pulls until the buffer is empty -
const readable = getReadableStream();

readable.on("readable", () => {
  let chunk;
  while ((chunk = readable.read()) !== null) {
    processChunk(chunk);
  }
});

readable.on("end", () => {
  console.log("Stream ended");
});
The readable event tells the consumer that a read may produce a chunk. The loop keeps pulling until read() returns null, leaving the consumer in control of when chunks are removed from the buffer.
Flowing-mode consumption attaches a data listener instead -
const readable = getReadableStream();

readable.on("data", (chunk) => {
  processChunk(chunk);
});

readable.on("end", () => {
  console.log("Stream ended");
});
As soon as the data listener is attached, the stream switches to flowing mode and pushes chunks automatically. If processChunk() is slow, data can build up in memory unless the consumer adds its own pressure control.
In flowing mode, that usually means pausing while the consumer catches up -
readable.on("data", (chunk) => {
  const canContinue = processChunk(chunk);
  if (!canContinue) {
    readable.pause();
    // Later, when processing catches up:
    // readable.resume();
  }
});
When processChunk() indicates that the consumer cannot keep up, pause() stops further data events. Later, after the consumer catches up, resume() restarts the flow.
There is also a more direct paused-mode pattern - call read(size) yourself and install a one-time readable listener only when not enough data is buffered. This is useful when the consumer needs a specific number of bytes. If that many bytes are not available, read(size) returns null unless the stream has ended, in which case it returns the remaining buffered data.
function readNextChunk() {
  const chunk = readable.read(100);
  if (chunk === null) {
    readable.once("readable", readNextChunk);
    return;
  }

  console.log(`Read ${chunk.length} bytes`);
}

readNextChunk();
That pattern gives the consumer precise control over chunk size, which is useful for protocols with fixed-size headers or structures.
The mode choice affects memory and concurrency. Paused mode makes pulling explicit. Flowing mode keeps simple consumers concise, but slow consumers must add their own pressure control. Both modes still depend on the same internal buffer, which is where highWaterMark starts to show up in real behavior.
Internal Buffering
The internal queue sits between the source and user code. A file descriptor, socket, generator, or database cursor does not hand chunks directly to the consumer. It gives chunks to the Readable stream, and the stream decides when those chunks are buffered, exposed, emitted, or used to request more data.
That buffer is a queue of chunks. When the stream pulls data from the underlying source, chunks enter the queue. When the consumer calls read() in paused mode or receives data events in flowing mode, chunks leave it. The queue grows when the source produces faster than the consumer drains, and it shrinks when the consumer catches up.
The buffer is not one large Buffer object. Each chunk remains its own value until the stream returns or combines data for the consumer. The exact internal data structure is an implementation detail, so application code should rely on public properties such as readableLength, readableHighWaterMark, and readableFlowing instead of Node's private state objects.
You can inspect the public state directly -
console.log(`Buffered length ${readable.readableLength}`);
console.log(`highWaterMark ${readable.readableHighWaterMark}`);
console.log(`Flowing state ${readable.readableFlowing}`);
readableLength reports how many bytes or objects are currently buffered, depending on stream mode. readableHighWaterMark is the configured threshold. readableFlowing is null, false, or true.
During one-off debugging, readable._readableState can still be inspected, but treat it as a private implementation detail, not an API.
Refilling starts when the buffer's total length is below highWaterMark and the stream needs more data, either because a consumer is reading or because the stream is flowing. At that point, the stream calls _read().
Custom Readable streams provide this method directly. Built-in streams such as fs.createReadStream() provide it through Node's internals.
The call to _read() means the buffer has room. The implementation should fetch data from the source and hand it back with push() -
import { Readable } from "node:stream";

class MyReadable extends Readable {
  _read(size) {
    const chunk = this.getDataFromSomeTypeOfSource(size);
    if (chunk) {
      this.push(chunk); // Adds to internal buffer
    } else {
      this.push(null); // Signals end of data
    }
  }
}
The _read(size) method receives a size hint, usually based on highWaterMark, that suggests how much data to fetch. It is only a hint. The implementation may push more or less, and it does not need to wait until exactly size bytes are available before calling push(). Respecting the hint still helps keep I/O sizing predictable.
Calling this.push(chunk) hands the chunk to the stream. If the stream is flowing, the chunk may be emitted immediately as a data event when a consumer is ready. If the stream is paused, the chunk remains buffered and a readable event may be emitted to tell the consumer that a later read() can succeed.
The return value from push() is the backpressure signal. If it returns false, the buffer has reached or exceeded highWaterMark, specifically when state.length >= state.highWaterMark, and the stream is asking the source to stop producing for now.
Node cannot force an arbitrary producer to stop, so a custom _read() implementation has to respect that signal. The stream will call _read() again later when the buffer drains below the threshold.
The same contract appears in a simplified file reader. The class stores a file descriptor and lets _read() pull from it -
import { Readable } from "node:stream";
import * as fs from "node:fs";

class FileReader extends Readable {
  constructor(fd, options) {
    super(options);
    this.fd = fd;
  }
}
The read method belongs inside FileReader. It allocates a buffer based on the size hint, reads from the descriptor, and then pushes data, EOF, or an error -
_read(size) {
  const readSize = Math.max(1, size || 64 * 1024);
  const buffer = Buffer.allocUnsafe(readSize);

  fs.read(this.fd, buffer, 0, readSize, null, (err, bytesRead) => {
    if (err) {
      this.destroy(err);
    } else if (bytesRead === 0) {
      this.push(null); // EOF
    } else {
      this.push(buffer.subarray(0, bytesRead));
    }
  });
}
The destroy hook, also inside FileReader, closes the descriptor when the stream ends or fails -
_destroy(err, callback) {
  if (this.fd === null) {
    callback(err);
    return;
  }

  fs.close(this.fd, (closeErr) => {
    this.fd = null;
    callback(err ?? closeErr);
  });
}
When _read() is called, the stream reads up to the requested size and pushes the bytes that were actually read. A zero-byte read means EOF, so the code pushes null. A read error destroys the stream with that error, which gives the lifecycle machinery a chance to emit error and run _destroy().
The stream implementation guarantees that _read() will not be called again until this implementation calls push(). Even though fs.read() is asynchronous, the example does not need its own in-flight flag to prevent overlapping reads. The same state machine also applies backpressure - _read() will not be called again until the buffer drains below highWaterMark.
The accounting changes in object mode. In byte mode, the buffer tracks total bytes and compares that total with a byte-based highWaterMark. In objectMode, it tracks the number of objects and compares that count with an object-count-based threshold. The buffering contract is the same, but the unit changes.
There is one more state worth keeping in mind. Internally, a Readable stream also tracks whether it is currently reading. If _read() has been called and has not yet pushed data or null, the stream will not call _read() again. That prevents redundant reads and keeps asynchronous sources from being overwhelmed by concurrent read requests.
All of this buffering exists to handle differences between the source's data rate and the consumer's data rate. A network socket may receive packets in bursts. A consumer may pause while a database write finishes. The internal queue smooths those uneven rates, and highWaterMark controls how much data the stream is willing to keep ahead of the consumer.
Implementing Custom Readable Streams
Custom Readable streams are useful when a library or application has its own source of data. The source might be a wrapper around a database cursor, a protocol parser, a generated sequence, or a file format that needs custom decoding.
In each case, the stream's job is the same - implement _read() so chunks are produced only when the Readable state machine asks for them.
A small starting point is a stream that emits numbers from 1 to N -
import { Readable } from "node:stream";

class CounterStream extends Readable {
  constructor(max, options) {
    super(options);
    this.max = max;
    this.current = 1;
  }

  _read() {
    if (this.current <= this.max) {
      this.push(String(this.current));
      this.current++;
    } else {
      this.push(null);
    }
  }
}
This stream pushes each number as a string. When the counter exceeds max, it pushes null to signal the end.
The example does not check the return value of push() because it produces one chunk per _read() call. If the buffer fills, the stream will stop calling _read() until it drains.
A consumer can read those chunks in flowing mode -
const counter = new CounterStream(5);

counter.on("data", (chunk) => {
  console.log(`Received ${chunk}`);
});

counter.on("end", () => {
  console.log("Counter ended");
});

counter.on("error", (err) => {
  console.error("Counter failed", err);
});
Output -
Received 1
Received 2
Received 3
Received 4
Received 5
Counter ended
A more realistic custom stream has to manage partial data across reads. A line reader for a large log file or CSV file is a good example because file reads return byte chunks, while the consumer wants complete lines.
The file-system APIs used below are covered in the file-system chapter.
The class starts by opening the file descriptor in _construct(). That hook lets asynchronous construction finish before _read() runs.
import { close, open, read } from "node:fs";
import { Readable } from "node:stream";
import { StringDecoder } from "node:string_decoder";

class LineStream extends Readable {
  constructor(filePath, options) {
    super({ ...options, encoding: "utf8" });
    this.filePath = filePath;
    this.fd = null;
    this.decoder = new StringDecoder("utf8");
    this.text = "";
    this.reachedEof = false;
    this.endPushed = false;
    this.reading = false;
  }

  _construct(callback) {
    open(this.filePath, "r", (err, fd) => {
      if (!err) this.fd = fd;
      callback(err);
    });
  }
}
The next methods belong inside LineStream. The read side first drains already-decoded complete lines. Only after that does it ask the file descriptor for more bytes.
_read(size) {
  if (!this.pushBufferedLines()) return;
  if (this.reading) return;

  this.readFromFile(size);
}

readFromFile(size) {
  if (this.reachedEof) {
    if (!this.endPushed) {
      this.endPushed = true;
      this.push(null);
    }
    return;
  }

  const readSize = Math.max(1, Math.min(size || 64 * 1024, 64 * 1024));
  const buffer = Buffer.allocUnsafe(readSize);
  this.reading = true;

  read(this.fd, buffer, 0, buffer.length, null, (err, bytesRead) => {
    this.handleReadResult(err, buffer, bytesRead, size);
  });
}
The callback is separated from readFromFile() so the state changes stay easy to follow. It clears the in-flight flag, sends errors through destroy(err), flushes the decoder at EOF, and continues reading only while line pushes stay below the high water mark.
handleReadResult(err, buffer, bytesRead, size) {
  this.reading = false;

  if (err) {
    this.destroy(err);
    return;
  }

  if (bytesRead === 0) {
    this.reachedEof = true;
    this.text += this.decoder.end();
    if (this.pushBufferedLines(true)) {
      this.endPushed = true;
      this.push(null);
    }
    return;
  }

  this.text += this.decoder.write(buffer.subarray(0, bytesRead));
  if (this.pushBufferedLines()) {
    this.readFromFile(size);
  }
}
This helper also belongs inside LineStream. The line buffer stores partial text between file reads. If push() returns false, the helper leaves the remaining text in place for a later _read().
pushBufferedLines(flush = false) {
  let lineEnd;
  while ((lineEnd = this.text.indexOf("\n")) !== -1) {
    let line = this.text.slice(0, lineEnd);
    if (line.endsWith("\r")) line = line.slice(0, -1);
    this.text = this.text.slice(lineEnd + 1);
    if (!this.push(line)) return false;
  }

  if (flush && this.text.length > 0) {
    let line = this.text;
    if (line.endsWith("\r")) line = line.slice(0, -1);
    this.text = "";
    if (!this.push(line)) return false;
  }

  return true;
}
The destroy hook, also inside LineStream, closes the descriptor whether the stream finishes normally or fails.
_destroy(err, callback) {
  if (this.fd === null) {
    callback(err);
    return;
  }

  close(this.fd, (closeErr) => {
    this.fd = null;
    callback(err ?? closeErr);
  });
}
The complete stream reads byte chunks from a file, decodes UTF-8 safely across chunk breaks, collects text, and pushes complete lines. When it encounters a newline, it pushes the line without the newline and strips a trailing \r from CRLF input. If text remains when the file ends, it pushes that text as the final line.
The _destroy() method closes the file descriptor when the stream is destroyed. By default, Readable streams have autoDestroy: true, so _destroy() is called automatically after the stream ends, after push(null). The this.fd check handles the case where the descriptor was never opened or has already been closed.
The backpressure point is in pushBufferedLines(). When push() returns false, the method returns early and keeps the remaining text queued for the next _read() call. If the consumer pauses or the buffer fills, the stream stops pushing lines until it is asked for more.
For sources that are already iterable, extending Readable is often unnecessary. Readable.from() creates a Readable stream from an iterable or async iterable, so an array, generator, or async generator can become a stream with one call.
import { Readable } from "node:stream";

async function* generateNumbers() {
  for (let i = 1; i <= 5; i++) {
    await new Promise((resolve) => setTimeout(resolve, 100));
    yield i;
  }
}

const stream = Readable.from(generateNumbers());

stream.on("data", (num) => {
  console.log(`Received ${num}`);
});

stream.on("error", (err) => {
  console.error("Number stream failed", err);
});
Readable.from() fits sources that are naturally expressed as iterables. It calls the async generator's next() method, waits for the promise to resolve, pushes the yielded value into the stream, and repeats until the generator is done. For structured data or simple custom sources, that can remove the need to implement _read() yourself.
Whether the source is hand-written or iterable-backed, failures need to enter the stream lifecycle. If an error occurs while fetching data, destroy the stream with that error. That stops the stream, emits error, and gives cleanup hooks a chance to run.
_read() {
  this.fetchData((err, data) => {
    if (err) {
      this.destroy(err); // Emits "error" event
    } else if (data === null) {
      this.push(null); // End of stream
    } else {
      this.push(data);
    }
  });
}
Calling this.destroy(err) transitions the stream to a destroyed state. No more _read() calls will be made, and error will be emitted with the error object. If _destroy() exists, it will run to clean up resources.
For asynchronous sources, check this.destroyed before pushing from a callback or resolved promise, because the stream may have been destroyed while the operation was pending.
Consuming Patterns
Once a Readable stream exists, the consumer still has to choose how chunks leave it. The main styles differ in where control lives - event handlers, an async loop, explicit reads, or a stream-to-stream pipeline.
Event-based consumption in flowing mode attaches data and end listeners and lets the stream push chunks to user code.
readable.on("data", (chunk) => {
  processChunk(chunk);
});

readable.on("end", () => {
  console.log("Done");
});

readable.on("error", (err) => {
  console.error("Error", err);
});
This style works well when processing is fast. If processChunk() is slow or asynchronous, the handler returns before the work is done, so the consumer must add backpressure manually with pause() and resume().
Async iteration consumption fits code that needs to await per-chunk work. Readable streams are async iterables, so they can be consumed with for await...of.
try {
  for await (const chunk of readable) {
    await processChunk(chunk);
  }
  console.log("Done");
} catch (err) {
  console.error("Error", err);
}
This pattern handles consumer-side backpressure at the loop edge. If processChunk() returns a promise, the loop waits for it to resolve before processing the next chunk.
The stream may still prefetch into its internal buffer up to its high water mark, so async iteration is not a zero-read-ahead mechanism. It is a good default when each chunk maps to one awaited operation and stream-to-stream composition is not needed.
Explicit read() consumption in paused mode keeps control with the consumer. The consumer calls read() only when it is ready for data.
readable.on("readable", () => {
  let chunk;
  while ((chunk = readable.read()) !== null) {
    processChunk(chunk);
  }
});

readable.on("end", () => {
  console.log("Done");
});
When the consumer needs exact byte counts, read(size) can pull a specific number of bytes. That is useful for binary protocols with fixed-size headers or length-prefixed bodies.
let header = null;
let bodyLength = null;

readable.on("readable", () => {
  while (true) {
    if (header === null) {
      header = readable.read(4);
      if (header === null) return;
      bodyLength = header.readUInt32BE(0);
    }

    if (bodyLength === 0) {
      processMessage(header, Buffer.alloc(0));
      header = null;
      bodyLength = null;
      continue;
    }

    const body = readable.read(bodyLength);
    if (body === null) return;

    processMessage(header, body);
    header = null;
    bodyLength = null;
  }
});
This pattern gives precise control, but it also makes the consumer responsible for its own state machine. The code must preserve the header while it waits for the full body, and it must decide what to do if the stream ends with a partial message.
Using pipe() connects a Readable stream to a Writable stream and handles stream-to-stream backpressure. Pipes and Writable streams get dedicated coverage later.
readable.pipe(writable);

readable.on("error", (err) => {
  console.error("Read error", err);
});

writable.on("error", (err) => {
  console.error("Write error", err);
});
The pipe() method listens for data events on the Readable stream and calls write() on the Writable stream. If write() returns false, the Writable buffer is full, so pipe() pauses the Readable stream. When the Writable emits drain, pipe() resumes the Readable stream.
That automatic pressure handling does not make pipe() a complete lifecycle manager. Errors do not propagate automatically, so both streams need error listeners. If an error occurs in the middle of piping, cleanup can also be awkward because the streams may not be closed or destroyed the way the application expects.
Using stream.pipeline() is the safer alternative for stream-to-stream composition. It connects the streams and centralizes error handling and cleanup.
import { pipeline } from "node:stream/promises";

try {
  await pipeline(readable, writable);
  console.log("Pipeline succeeded");
} catch (err) {
  console.error("Pipeline failed", err);
}
The pipeline() function from node:stream/promises returns a promise that resolves when the pipeline completes successfully or rejects if any stream emits an error. On error, pipeline() destroys the streams that still need cleanup, with documented exceptions for streams that have already emitted completion events such as end, finish, or close. That behavior makes it the safer default for composing streams in production code.
Transform functions can also be passed to pipeline(), which later chapters use when covering Transform streams.
The choice comes down to where the slow work happens. Simple, fast processing can use event-based consumption. Per-chunk asynchronous work is usually clearer with async iteration. Binary protocol parsing often needs explicit read(). Stream-to-stream composition should usually use pipeline() because it centralizes backpressure, error propagation, and cleanup.
Mode Transitions and State Management
Mode transitions are where readable-side data loss and backpressure bugs often appear. The public readableFlowing state shows which mechanism is currently driving consumption.
When a Readable stream is created, readable.readableFlowing is null. This is the initial non-consuming state. Nothing has been attached that consumes data or intentionally discards it.
The first data listener changes that state to true. The stream enters flowing mode and emits buffered data immediately, or starts emitting as soon as data becomes available.
Calling pause() sets readableFlowing to false and stops data events. The internal buffer may still fill up to highWaterMark. The source keeps producing until the stream applies backpressure by stopping _read() calls.
Calling resume() sets readableFlowing back to true. The stream emits buffered chunks, and if the buffer drains below highWaterMark, _read() is called again to fetch more data.
Attaching a readable listener moves the stream into non-flowing consumption. readableFlowing becomes false, and data must be pulled with read(). In current Node.js, resume() has no effect while a readable listener is active.
Removing all data listeners is not the same thing as pausing. If the stream is not piped anywhere, readableFlowing remains true. Structurally, the stream is still flowing, but data events have no listener. The stream can continue draining its buffer and calling _read(), and chunks emitted during that window are not replayed to a later listener.
To stop processing, call pause() explicitly.
That difference shows up in middleware and wrappers that add and remove listeners dynamically. Removing a listener removes only the event destination. It does not necessarily stop the source.
Paused mode, shown as false, can come from an explicit pause() call, a readable listener, or destination backpressure in a pipe chain.
Code that treats listener removal as flow control can lose data or fail to slow the source.
Here is a snippet to observe these transitions -
const readable = getReadableStream();

console.log(`Initial flowing ${readable.readableFlowing}`); // null

readable.on("data", (chunk) => {
  console.log(`Received ${chunk.length} bytes`);
});

console.log(`After data listener ${readable.readableFlowing}`); // true

readable.removeAllListeners("data");
console.log(`After removing listeners ${readable.readableFlowing}`); // true

readable.pause();
console.log(`After pause ${readable.readableFlowing}`); // false

readable.resume();
console.log(`After resume ${readable.readableFlowing}`); // true
The readableFlowing property is public and safe to read. It reflects the current state as null, false, or true.
Another state flag is ended. Once the stream has emitted end, no more data will be emitted. A later read() returns null, and the stream remains ended until it is destroyed. Even if new data somehow becomes available, which should not happen in a well-behaved stream, an ended stream will not emit it.
The destroyed flag tracks a stronger lifecycle change. Calling destroy(err) releases resources and prevents future reads or pushes. It may emit error for the provided error and then close unless emitClose is disabled. After destruction, later calls are no-ops or fail with stream-destroyed errors depending on the method.
When a stream appears stuck, these flags usually narrow the search quickly. The stream may be paused when the code expects flowing mode, ended when the code expects more data, or destroyed while an asynchronous source is still trying to push.
Backpressure in Practice
Backpressure failures often appear when a data handler starts asynchronous work and returns before that work finishes.
Suppose a program reads a large file and sends each chunk to an API. Each request takes 100 ms. This code is intentionally broken because it ignores backpressure and does not handle request failures -
import { createReadStream } from "node:fs";

const readable = createReadStream("large-file.txt");

readable.on("data", async (chunk) => {
  await fetch("https://api.example.com/process", {
    method: "POST",
    body: chunk,
  });
});

readable.on("end", () => console.log("Done"));
readable.on("error", (err) => console.error("Read failed", err));
The async handler does not slow the stream. Each data event starts a request, then returns a promise that the stream does not await. The stream keeps emitting chunks, which can create thousands of in-flight requests for a large file with small chunks.
That is the bug. The HTTP request logic is slower than the file read, but nothing tells the producer to wait.
One repair is explicit pause and resume -
import { createReadStream } from "node:fs";

const readable = createReadStream("large-file.txt");

readable.on("data", async (chunk) => {
  readable.pause();

  try {
    await fetch("https://api.example.com/process", {
      method: "POST",
      body: chunk,
    });
  } catch (err) {
    readable.destroy(err);
  } finally {
    if (!readable.destroyed) {
      readable.resume();
    }
  }
});

readable.on("end", () => console.log("Done"));
readable.on("error", (err) => console.error("Processing failed", err));
Now the handler pauses the stream before starting the request. While the request is pending, no further data events are emitted. When the request settles, the handler resumes the stream unless it has been destroyed. The result is serialized processing with one request in flight at a time, so the file read rate follows the request rate.
This pattern works, but it is easy to get wrong. Error handling and flow control sit in the same handler, and a missed resume can leave the stream paused.
Async iteration expresses the same serialized behavior more directly -
import { createReadStream } from "node:fs";

const readable = createReadStream("large-file.txt");

try {
  for await (const chunk of readable) {
    await fetch("https://api.example.com/process", {
      method: "POST",
      body: chunk,
    });
  }

  console.log("Done");
} catch (err) {
  console.error("Processing failed", err);
}
The loop body will not process the next chunk until the current await completes, so the consumer's asynchronous work stays serialized without explicit pause and resume calls. The stream may still prefetch into its internal buffer up to its high water mark, so this is backpressure at the consumer edge, not a guarantee of zero read-ahead.
If the desired behavior is bounded concurrency, such as five requests in flight at once, async iteration alone is not enough. Use a small limiter around the async work or a library such as p-limit.
Backpressure is automatic only when the chosen mechanism enforces it. Event-based consumption with data listeners does not enforce it by default. Pause and resume must be added manually. Async iteration keeps per-chunk async work serialized while allowing normal stream buffering. pipe() and pipeline() enforce stream-to-stream backpressure by monitoring the Writable stream's state. Choose the pattern based on where the slow work happens.
Reading in Object Mode
Object mode keeps the Readable contract but changes the unit of buffering. Instead of pushing Buffer objects or strings, the stream pushes arbitrary JavaScript values. Instead of measuring highWaterMark in bytes, it measures it in objects.
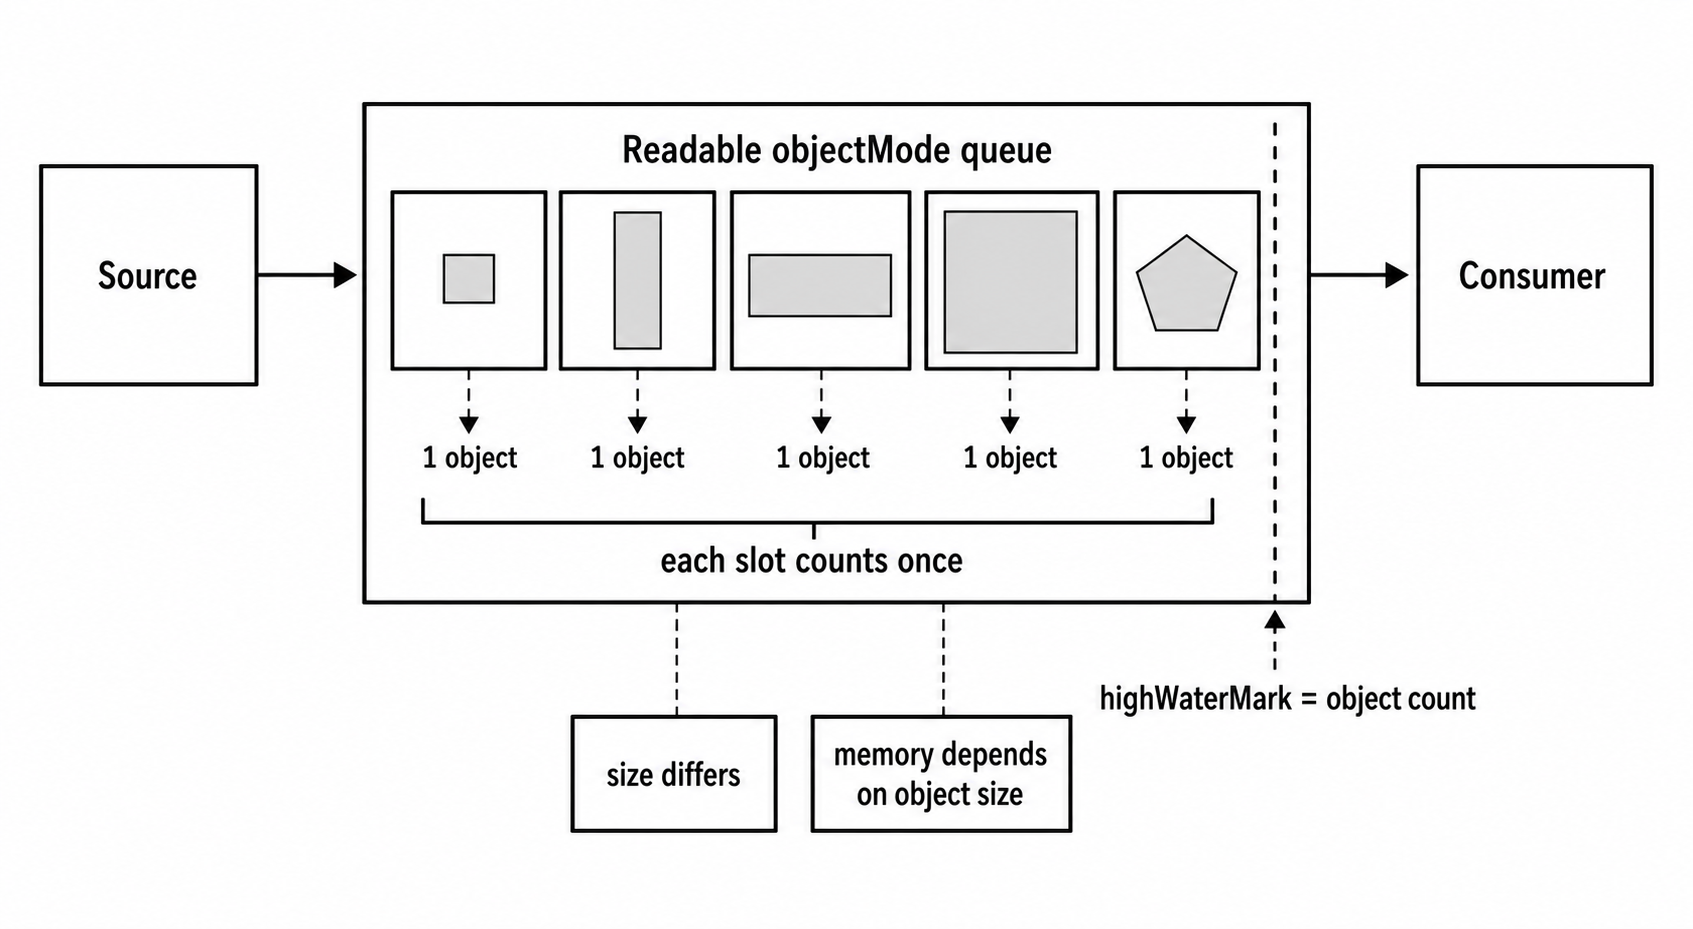
Figure 3 - In object mode, each queued value counts as one chunk. Large objects still count as one item, so memory use depends on object size as well as object count.
Here is a Readable stream that emits database rows. The constructor enables object mode and keeps a small queue for rows that have been fetched but not yet pushed -
import { Readable } from "node:stream";

class RowStream extends Readable {
  constructor(db, query, options) {
    super({ ...options, objectMode: true });
    this.db = db;
    this.query = query;
    this.offset = 0;
    this.pending = [];
    this.pendingIndex = 0;
    this.querying = false;
  }
}
The read method belongs inside RowStream. It first drains pending rows, then starts another database query only if nothing else is already in flight -
_read() {
  if (!this.pushPendingRows() || this.querying || this.destroyed) return;

  this.querying = true;
  this.db.query(this.query, { offset: this.offset, limit: 100 })
    .then((rows) => {
      this.querying = false;
      if (this.destroyed) return;

      if (rows.length === 0) {
        this.push(null);
        return;
      }

      this.offset += rows.length;
      this.pending = rows;
      this.pendingIndex = 0;
      this.pushPendingRows();
    })
    .catch((err) => this.destroy(err));
}
The helper pushes rows until the queue is empty or the stream asks it to stop -
pushPendingRows() {
  while (this.pendingIndex < this.pending.length) {
    if (!this.push(this.pending[this.pendingIndex++])) return false;
  }

  this.pending = [];
  this.pendingIndex = 0;
  return true;
}
The stream queries in batches of 100 rows, but each row is still pushed as its own object-mode chunk. The pending array and pendingIndex are needed because push() can return false halfway through a batch. When that happens, the remaining rows stay queued until Node calls _read() again. The destroyed check prevents an already-destroyed stream from pushing rows after an async query resolves.
The consumer sees a stream of row objects -
const stream = new RowStream(db, "SELECT * FROM users");

try {
  for await (const row of stream) {
    console.log(`User ${row.name}, Email ${row.email}`);
  }
} catch (err) {
  console.error("Row stream failed", err);
}
Object mode fits structured data that already maps to records rather than bytes. Instead of serializing rows to JSON, pushing that JSON as a Buffer, and parsing it again in the consumer, the stream can push row objects directly.
Since highWaterMark is an object count, not a byte count, memory usage depends on the size of the objects being pushed. If a stream pushes 16 objects and each is 10 MB, it is buffering 160 MB even though highWaterMark is 16. Node has no way to measure the byte size of arbitrary JavaScript objects, so the implementation must choose highWaterMark values from expected object sizes.
Edge Cases and Debugging
Readable-side bugs usually come from mismatched lifecycle expectations. An empty stream may end before a consumer sees data. An error may have no listener. Destruction may discard buffered chunks. Consumption styles may get mixed. read(size) may be expected to wait even though it returns immediately.
Empty streams. A Readable stream can end immediately without pushing any data. If _read() calls push(null) without first pushing a chunk, the stream emits end without emitting data. That is valid and sometimes intentional, as with an empty file, but consumers should not assume that every stream emits at least one chunk.
Unhandled error events. If a Readable stream emits error and no listener is attached, Node throws the error and can terminate the process. Attach an error listener even if it only logs the failure.
Destroyed streams. Once a stream is destroyed, it can no longer be read. Destroying a stream while it still has buffered data discards that data. Use destroy(err) for errors and aborts. If the source is simply finished and buffered data should still be delivered, call push(null) to signal EOF instead of destroying immediately.
Mixing consumption patterns. Attaching both a readable listener and a data listener to the same stream makes behavior hard to reason about. A readable listener prevents the stream from entering flowing mode, even if a data listener is attached afterward. The readable listener takes precedence, and data events will not fire as expected. Stick to one consumption pattern per stream.
Misunderstanding read(size). Calling read(size) returns exactly size bytes when that many bytes are buffered. If fewer bytes are available, it returns null unless the stream has ended, in which case it returns the remaining buffered data. read(size) returns immediately. It does not block.
Ignoring readable.destroyed. Custom stream logic should check readable.destroyed before calling methods such as read() or push(), especially from asynchronous callbacks. Operating on a destroyed stream can lead to errors or unexpected behavior.
For debugging, start with public state -
console.log({
  length: readable.readableLength,
  highWaterMark: readable.readableHighWaterMark,
  flowing: readable.readableFlowing,
  destroyed: readable.destroyed,
});
If public state is not enough during local debugging, readable._readableState can reveal private fields such as buffer, length, reading, and ended. Do not write production logic against those fields. They are not part of the public API.
You can also enable debug logging for streams by setting the NODE_DEBUG environment variable -
NODE_DEBUG=stream node your-script.jsThis logs detailed internal stream events to stderr, including when _read() is called, when data is pushed, and when events are emitted. The output is verbose, but it can make the operation order much easier to see.
Memory and highWaterMark
highWaterMark is a tuning point, not a universal answer. The current generic default is 64 KiB. Treat it as a starting point, not as a workload-specific tuning decision.
When large-file streaming has a source and consumer that are roughly balanced in speed, increasing highWaterMark can improve throughput. A larger buffer can mean fewer system calls to read from the source. For example, reading from a fast SSD with a 128 KiB or 256 KiB threshold can reduce repeated fs.read() overhead.
import { createReadStream } from "node:fs";

const readable = createReadStream("large-file.bin", {
  highWaterMark: 128 * 1024, // 128 KiB
});
The trade-off is memory. If a server processes thousands of streams concurrently, such as one stream per request reading from a file, those buffers add up quickly. In that case, lowering highWaterMark can reduce the per-stream memory footprint.
import { createReadStream } from "node:fs";

const readable = createReadStream("file.txt", {
  highWaterMark: 4 * 1024, // 4 KiB
});
Latency can count too, but it is easy to overstate. Readable streams do not generally wait to fill the whole highWaterMark before delivering chunks. The threshold affects read sizing, prefetching, and memory pressure. For some real-time sources, lowering it can reduce how much data is buffered ahead of the consumer. For others, chunk timing is dominated by the source itself.
In objectMode, the same trade-off uses object count as the unit. If each object is small, a highWaterMark of 16 might be too low, causing frequent _read() calls and reducing throughput. If each object is large, 16 might be too high, consuming too much memory.
Choose highWaterMark from measurements - resident memory, chunk latency, throughput, and concurrency. The default is usually acceptable, but performance-sensitive paths may need tuning.
Readable.from() and Async Iterables
Readable.from() approaches custom sources from a different direction. If code already produces an iterable or async iterable, it can participate in the stream API without a custom _read() method.
Suppose an async generator fetches paginated data from an API -
async function* fetchPages(url) {
  let page = 1;
  while (true) {
    const response = await fetch(`${url}?page=${page}`);
    if (!response.ok) {
      throw new Error(`Request failed: ${response.status}`);
    }

    const data = await response.json();
    if (data.items.length === 0) break;
    for (const item of data.items) {
      yield item;
    }
    page++;
  }
}
The generator fetches pages and yields each item. Turning it into a Readable stream is just a call to Readable.from() -
import { Readable } from "node:stream";

const stream = Readable.from(fetchPages("https://api.example.com/items"));

for await (const item of stream) {
  await writeItem(item);
}
Here, writeItem() stands in for an object-mode destination such as a database write, queue publish, or application-specific handler.
Readable.from() handles the stream machinery. It calls the generator's next() method, waits for the promise to resolve, pushes the yielded value into the stream, and repeats. If the generator throws, the stream emits error. If the generator completes, the stream pushes null to signal the end.
By default, Readable.from() sets objectMode: true unless { objectMode: false } is passed explicitly. That is the right default when the iterable yields JavaScript objects, but it affects piping. A byte-mode Writable expects strings, buffers, typed arrays, or data views, not arbitrary objects.
If fetchPages() yields objects, use an object-mode consumer, as above, or serialize the items before piping them to a byte-oriented destination.
This pattern composes well. A function that returns an async iterable can join the stream ecosystem with one call. It gets stream backpressure, event-based consumption, piping, and pipeline() compatibility without a hand-written _read() method.
You can also pass regular iterables, not just async ones -
import { Readable } from "node:stream";

const stream = Readable.from([1, 2, 3, 4, 5]);

for await (const num of stream) {
  console.log(num);
}
This creates a Readable stream from an array, with each array element becoming one chunk. It is a simple way to convert synchronous data into a stream for testing or integration with stream-based APIs.
Readable streams are not only file and socket wrappers. They are a producer abstraction for sequences of values, whether those values come from I/O, computation, or iteration over data structures. Readable.from() makes that abstraction available to any iterable-producing code.
Where the Contract Ends
Readable streams give you a producer-side contract. Source reads enter an internal queue, highWaterMark controls when Node asks for more, consumption mode controls how chunks leave that queue, and destruction decides whether buffered data survives. That contract keeps buffering bounded only when every stage honors the pressure signal.
A Readable stream cannot make the consumer safe. A data listener that starts unbounded async work can still flood the process. A custom _read() that ignores push() can still over-buffer. An object-mode stream with huge objects can still consume more memory than the object count suggests.
Writable, Transform, and Duplex streams reuse these same buffering and backpressure contracts. The names change, and each side adds its own lifecycle details, but the readable-side model remains the part that decides when data is requested, queued, emitted, and abandoned.