Buffer Fragmentation, Retained Views, and External Memory
Buffer fragmentation is not caused by one API call. It comes from allocation sizes, how long those allocations stay reachable, and which references keep backing memory alive.
In production, it often shows up as rss growing faster than the JavaScript heap, or as a service that keeps holding resident memory after traffic returns to normal. Buffer payloads live in external memory accounted to V8, and process.memoryUsage().arrayBuffers includes memory allocated for ArrayBuffer, SharedArrayBuffer, and Buffer instances. Some small Buffer APIs may share slabs. Other Buffer allocations use separate backing stores managed by V8, the runtime, and the native allocator.
A retained slice can keep a larger allocation alive because the view still points at the same memory. That lifetime bug can look similar to allocator fragmentation in dashboards. rss rises, GC work increases, allocations start to stall, and heap snapshots do not look large enough to explain the process size.
The fixes are usually plain engineering discipline - bounded queues, prompt reference release, copies for tiny retained regions, and streams for large payloads.
The previous sections established the core Buffer ownership rule. Views share memory. Copies allocate new backing storage. Fragmentation is where that rule starts showing up in memory graphs, queue behavior, and long-running services.
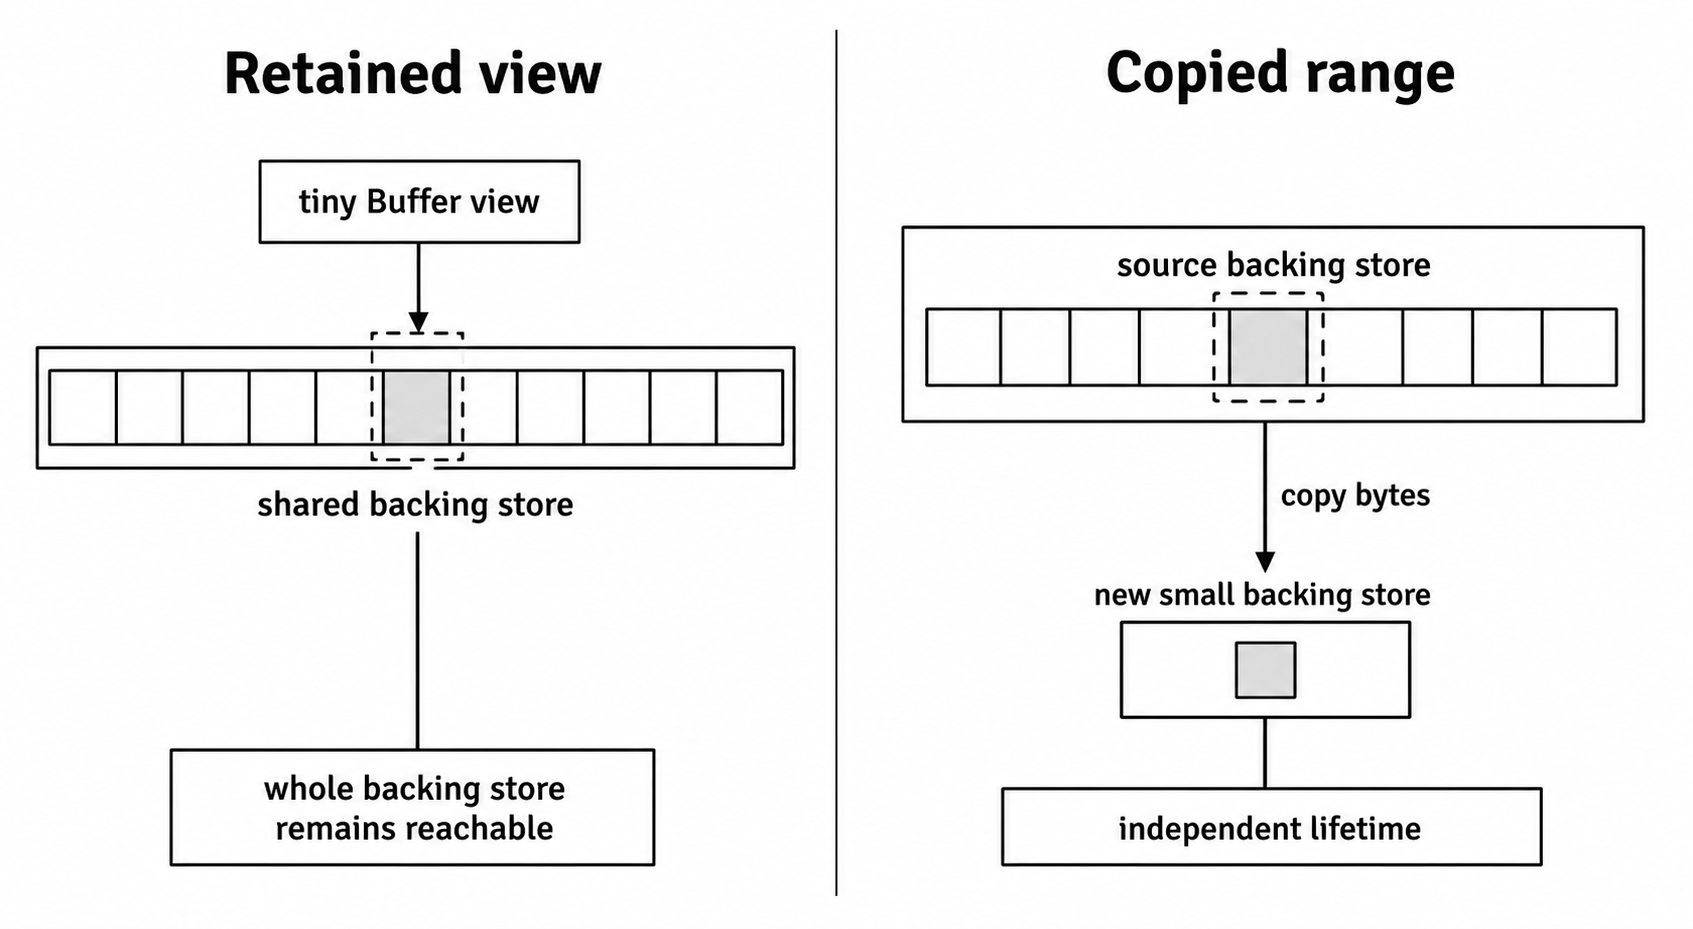
Figure 2.1 - A tiny Buffer view keeps the original backing store reachable. Copying the retained range costs allocation and byte copying, but it gives the smaller value its own lifetime.
Memory Fragmentation
Fragmentation is a long-running service problem. The process may have enough reusable memory in total, but that memory can be split across regions that do not fit later allocation requests well.
In a Buffer-heavy process, the usual symptom is stable heapUsed with rising rss, external, or arrayBuffers. On Linux systems that use glibc malloc, Node's own process.memoryUsage() documentation calls out sustained rss growth with stable V8 heap totals as a possible allocator-fragmentation symptom.
The problem starts below the JavaScript object.
Virtual vs. Physical Memory
Your process does not directly choose physical RAM addresses. It works inside a virtual address space, which is a large linear range that the operating system presents to each process. When native code asks for memory, the allocator needs a suitable range in that virtual address space and then coordinates with the operating system to back that range with pages.
Behind that address space, the Memory Management Unit (MMU), a piece of CPU hardware, works with the operating system to map virtual addresses to physical pages. Those physical pages do not need to sit next to each other. The same mapping also supports features such as swapping memory to disk and preventing one process from writing into another process's memory.
A large allocation needs a suitable range in the process's virtual address space and allocator state. It does not require one adjacent run of physical RAM.
Allocator State
When you call Buffer.alloc(65536) to get a 64 KiB Buffer for a file read, the runtime does not use its internal Buffer pool. That is because of the API, not only the size. Buffer.alloc() always returns zero-filled memory outside the internal pool.
Small pooled allocations are specific to APIs such as Buffer.allocUnsafe(), Buffer.from(array), Buffer.from(string), and Buffer.concat() when the requested size is below half of Buffer.poolSize.
That backing storage is ultimately handled by V8, the runtime, and the platform's native allocator. The exact system calls and allocator behavior are implementation details, but the service-level effect is visible. A JavaScript wrapper can be collected while native memory, allocator arenas, and resident pages behave differently from the V8 heap.
Trouble starts when the application repeats this pattern thousands of times with Buffers of varying sizes. Constant allocation and release can leave the allocator with free regions of different sizes, separated by live allocations. The process may still have enough reusable memory in total, but a later request can require fresh memory or fail under process limits if no suitable region is available.
Two categories show up in Buffer-heavy services.
External fragmentation is the case above. Enough total reusable memory may exist, but it is divided into separate regions. A later allocation may force the allocator to request more memory from the operating system, keep resident pages longer than expected, or fail when process or container limits are tight.
Internal fragmentation is different. It happens when an allocator reserves more memory than the application requested. If an allocator deals in blocks of 32, 64, and 128 bytes, then a 33-byte request may receive a 64-byte block. The remaining 31 bytes are allocated but unused.
The internal Buffer pool can also leave unused space inside a slab, and a tiny retained Buffer view can keep a larger pooled backing store alive. That is not the same as arbitrary gaps between fixed blocks. It is a trade-off Node makes to reduce allocation overhead for short-lived small Buffers.
A retained view is a lifetime problem, not allocator fragmentation by itself. It can look similar in memory graphs because a tiny JavaScript object keeps much larger external memory reachable. Keep that distinction clear when reading heap snapshots. Fragmentation is about allocator reuse. Retention is about references that are still live.
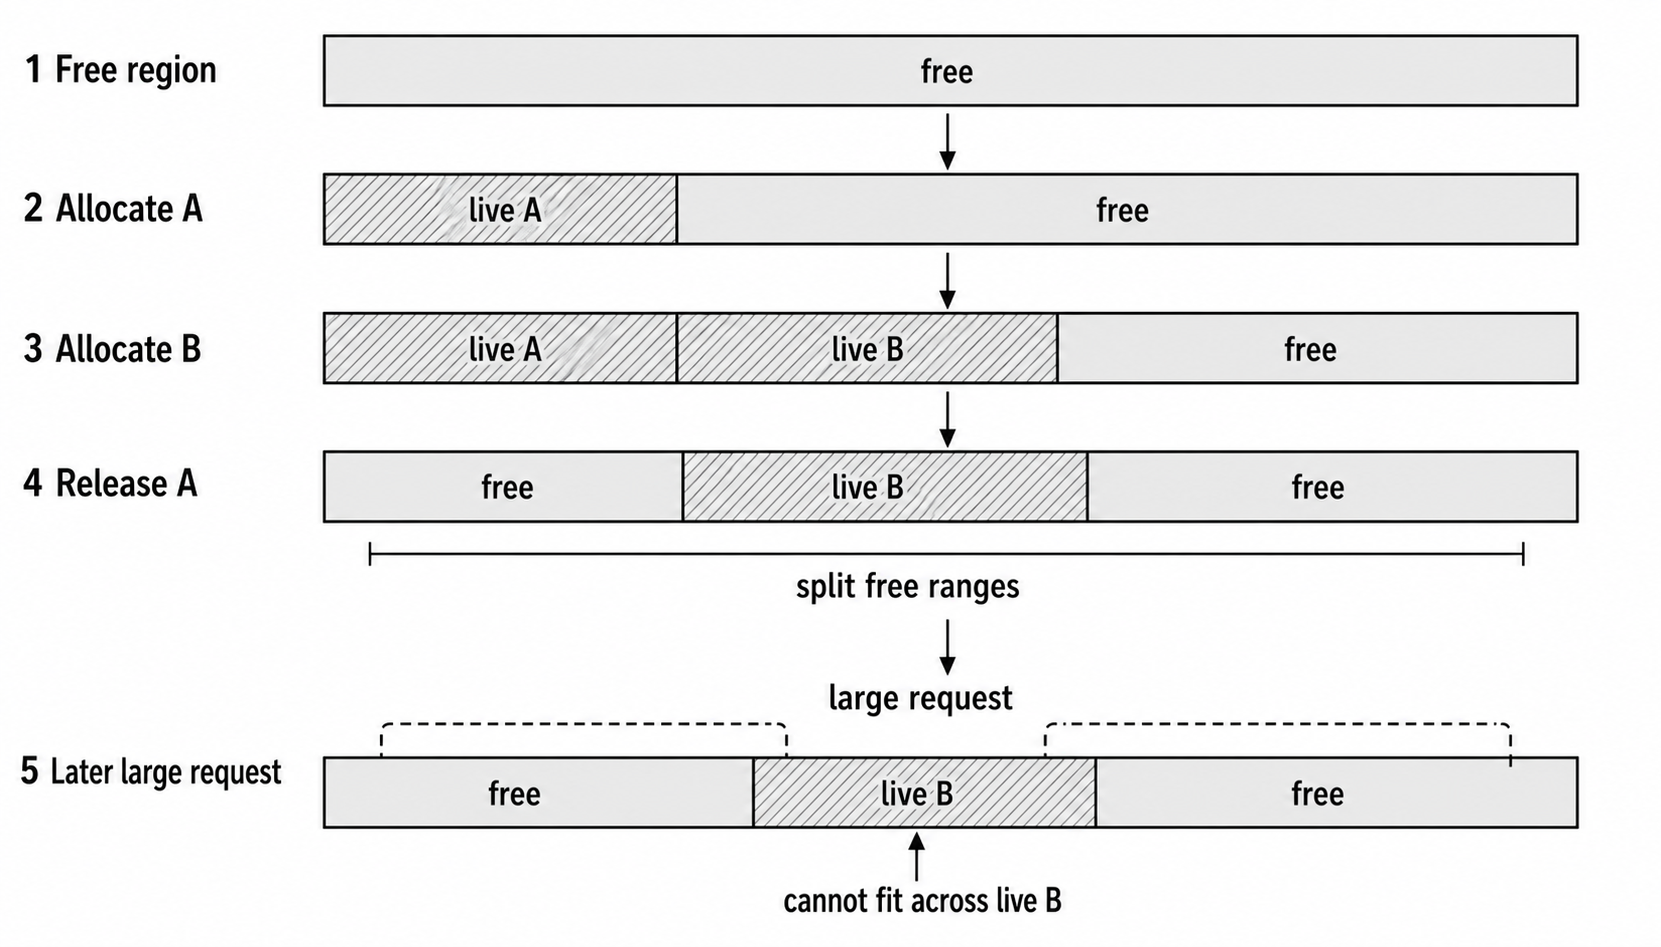
Figure 2.2 - Allocator pressure depends on reusable ranges, not only total free bytes. Separated free regions may be too small for a later contiguous allocation even when their combined size looks sufficient.
Read the figure as four states. The process starts with one large free region, allocates two Buffers, releases the first Buffer, and then holds two separated free regions around the still-live second Buffer. A later request may not be able to reuse the total free space as one allocation.
A later request might need a 1.2 MiB Buffer for a database dump. In the simplified diagram, the existing free regions cannot satisfy that request directly. In a real server, the allocator may request more memory from the operating system, keep rss high after traffic drops, or eventually fail with ENOMEM when limits are tight.
External fragmentation is not only about how many free bytes exist in total. It is also about where those bytes are and how the allocator can reuse them.
Reducing Allocation Churn
The risk grows when the application becomes a high-churn allocator client - many Buffers, varied sizes, and lifetimes that overlap unpredictably.
Buffer.poolSize defaults to 8192 bytes, and in Node v24 the pool is used by eligible APIs only below half of that size. Buffer.alloc() is outside that pool at every size.
You usually cannot change how the OS allocator works from application code, but you can change your allocation pattern. Reduce memory churn before reaching for runtime flags or allocator swaps.
Buffer.allocUnsafeSlow() is useful only in a narrow retained-small-chunk case. It never uses the shared internal pool, so it can avoid keeping an 8 KiB slab alive for one long-lived tiny Buffer. The trade-off is the same as Buffer.allocUnsafe(): the bytes are uninitialized until you overwrite them.
For ordinary retained data, Buffer.from(view) is usually clearer. Reach for allocUnsafeSlow() only when you have measured the pool-retention cost and the code immediately writes every retained byte.
Buffer Reuse
A hot path can often reduce churn by reusing a fixed backing Buffer instead of allocating per message. This often shows up inside a network data event handler or a tight binary-processing loop.
A server that processes incoming messages might need to frame each message with a 4-byte length header. For this example, assume chunk is already one complete message. A real TCP parser must handle arbitrary chunk breaks.
Allocating on Every Message
socket.on("data", (chunk) => {
  const header = Buffer.alloc(4);
  header.writeUInt32BE(chunk.length, 0);

  const framedPacket = Buffer.concat([header, chunk]);
  sendToNextService(framedPacket);
});
This version allocates a zero-filled header and then asks Buffer.concat() to allocate the full framed packet and copy both inputs. If the server handles 10,000 messages per second, that is 20,000 Buffer objects per second plus repeated byte copying.
Buffer.concat() may use the internal pool for small totals, but it still creates a new Buffer and copies the input bytes. Both the garbage collector and native allocator now have more work to do.
Reusing One Buffer
You can move the allocation out of the handler -
const MAX_PACKET_SIZE = 65536; // 64 KiB
const reusableBuffer = Buffer.alloc(MAX_PACKET_SIZE);
The handler writes into that backing store and sends a view over the valid range -
socket.on("data", (chunk) => {
  const length = chunk.length + 4;
  if (length > MAX_PACKET_SIZE) {
    return console.error("Packet too large for reusable buffer!");
  }

  reusableBuffer.writeUInt32BE(chunk.length, 0);
  chunk.copy(reusableBuffer, 4);
  sendToNextService(reusableBuffer.subarray(0, length));
});
This removes repeated backing-store allocation from the hot path. The subarray() call still creates a small Buffer wrapper, but it does not copy the bytes. The header allocation and the full-frame allocation performed by Buffer.concat() are gone.
Shared Memory Hazard
The optimized version has a serious ownership problem. The Buffer returned by subarray() shares the same underlying memory as reusableBuffer.
If sendToNextService is asynchronous, which is typical for network operations, queuing systems, and pipelines, the next packet can overwrite the reusable Buffer while the previous consumer is still reading it. The result is silent data corruption.
A single reusable Buffer is safe only when the consumer finishes synchronously before the function returns, or when the code coordinates Buffer lifetimes explicitly.

Figure 2.3 - A subarray() view shares the reusable Buffer's backing store. If the next message overwrites that store before the asynchronous consumer finishes, the earlier view observes new bytes.
Explicit Pooling
For asynchronous consumers, use an explicit checkout/release pool. A ring counter that wraps blindly is still unsafe. When in-flight work exceeds the pool size, it reuses memory that a previous operation may still be reading.
The pool starts with a fixed number of Buffers and a bounded list of waiters -
const POOL_SIZE = 32;
const MAX_PACKET_SIZE = 65536;
const MAX_WAITERS = 64;

const freeBuffers = Array.from(
  { length: POOL_SIZE },
  () => Buffer.alloc(MAX_PACKET_SIZE),
);

const waiters = [];
Checkout either returns an available Buffer, queues the caller, or rejects new work when the backlog is already too large -
function acquireBuffer() {
  const buffer = freeBuffers.pop();
  if (buffer !== undefined) return Promise.resolve(buffer);

  if (waiters.length >= MAX_WAITERS) {
    return Promise.reject(new Error("buffer pool backlog exceeded"));
  }

  socket.pause();
  return new Promise((resolve) => waiters.push(resolve));
}
Release hands the Buffer directly to the oldest waiter when work is already queued. Only when no waiter exists does it return the Buffer to the free list and resume the socket -
function releaseBuffer(buffer) {
  const resolve = waiters.shift();

  if (resolve !== undefined) {
    resolve(buffer);
    return;
  }

  freeBuffers.push(buffer);
  if (socket.isPaused()) socket.resume();
}
The data listener still delegates to an asynchronous handler and destroys the socket on failure -
socket.on("data", (chunk) => {
  void handleChunk(chunk).catch((error) => socket.destroy(error));
});
The handler holds the Buffer only for the duration of the asynchronous send. The finally block completes the ownership handoff - every successful checkout is released even if the downstream operation rejects.
async function handleChunk(chunk) {
  const length = chunk.length + 4;
  if (length > MAX_PACKET_SIZE) return console.error("Packet too large!");

  const buf = await acquireBuffer();

  try {
    buf.writeUInt32BE(chunk.length, 0);
    chunk.copy(buf, 4);
    await sendToNextService(buf.subarray(0, length));
  } finally {
    releaseBuffer(buf);
  }
}
The pool gives each in-flight operation its own backing Buffer and releases it only after the asynchronous consumer finishes. If the pool is exhausted, the socket is paused while work is backlogged. The waiter cap is just as useful as the pool itself. Without it, input pressure moves from Buffers into an unbounded promise queue.
In a production parser, combine this pattern with real message framing and explicit queue limits so retained chunks cannot grow without bound.
Use the ownership model to choose the strategy -
- Single reusable Buffer only if consumers are truly synchronous, which is rare.
- Buffer pool for asynchronous consumers with bounded concurrency.
- Copy to a new Buffer if you cannot bound in-flight work. Copy the data at send time, for example with
Buffer.from(framedPacketView). This costs one allocation per packet, but the ownership contract is simple.
The runtime has an internal Buffer pool for some small allocations, but only for specific APIs such as Buffer.allocUnsafe(), Buffer.from(array), Buffer.from(string), and Buffer.concat(). You still pay CPU cost to copy bytes with chunk.copy(); you are trading allocation cost for CPU copy cost.
Buffer reuse can improve allocation behavior, but shared memory requires careful lifetime management to avoid corruption.
Debugging the Memory Graph
When a Buffer-heavy service grows in memory, collect evidence before changing the allocation strategy -
process.memoryUsage()snapshots withrss,heapUsed,external, andarrayBuffersrssover time, especially before traffic, during peak load, and after traffic drops- Heap snapshots for retained JavaScript objects, with the caveat that Buffer payload bytes live outside the ordinary object graph
- GC logs when you need to separate JavaScript heap pressure from external-memory pressure
- Container or process memory limits, because
ENOMEMand OOM kills are limit problems even when the JavaScript heap looks stable - Queue depth, in-flight payload counts, and per-connection retained bytes
- Allocation-site sampling or native profiling when the process appears dominated by allocator work
external can include more than Buffer memory, and rss can stay high after references are dropped because allocators do not always return pages to the operating system immediately. Treat the counters as a pattern, not as a single proof.
A stable heap with rising arrayBuffers points toward retained backing stores. Stable arrayBuffers with rising rss points lower, toward allocator or native-memory behavior.
Understanding fragmentation starts with treating Buffer allocation as real work. Zero filling, native allocation, V8 accounting, and later reclamation all have costs. Hot paths become easier to reason about when you use bounded queues, prompt release, copies for tiny retained regions, and deliberate pooling.
Practice Lab
These challenges bring together the Buffer concepts from this chapter and the previous ones - fixed-offset parsing, endianness, retained views, stream state, pooling, and shared memory.
They are closer to production failure modes than simple API drills. Solutions are intentionally omitted. Build the parser, run it, inspect the bytes, and compare your output with the expected shape.
Start with fixed-size binary parsing.
Challenge #1
An IoT project sends sensor data packets over TCP to your server. The protocol is fixed-size. Every packet is exactly 24 bytes long and has this structure -
| Offset (Bytes) | Length (Bytes) | Data Type | Description |
|---|---|---|---|
| 0-3 | 4 | UInt32BE | Sensor ID |
| 4-11 | 8 | Float64BE | Timestamp (Unix epoch, ms) |
| 12-13 | 2 | UInt16BE | Sensor Type Code |
| 14 | 1 | UInt8 | Status Flags (a bitmask) |
| 15 | 1 | Int8 | Temperature (°C) |
| 16-19 | 4 | Float32BE | Humidity (%) |
| 20-23 | 4 | Float32BE | Pressure (kPa) |
Your Task
Write a function called parseSensorData that accepts a 24-byte Buffer. It should parse the Buffer according to the specification above and return a JavaScript object with the decoded values.
Use this sample Buffer to test your function -
const samplePacket = Buffer.from([
  0x00, 0x00, 0x01, 0xa4, // Sensor ID: 420
  0x42, 0x78, 0x56, 0xaa, 0x0c, 0x80, 0x00,
  0x00, // Timestamp: 1672531200000
  0x00, 0x01, // Sensor Type: 1 (Thermometer)
  0x05, // Status Flags: 00000101 (Bit 0 and Bit 2 are set)
  0x19, // Temperature: 25°C
  0x42, 0x48, 0x00, 0x00, // Humidity: 50.0
  0x42, 0xc8, 0x66, 0x66, // Pressure: 100.2
]);
The Goal
Your parseSensorData(samplePacket) function should return an object that looks like this -
{
  "sensorId": 420,
  "timestamp": 1672531200000,
  "sensorType": 1,
  "statusFlags": 5,
  "temperature": 25,
  "humidity": 50,
  "pressure": 100.19999694824219
}Floating-point precision might cause slight variations in the last decimal places, which is normal.
Things to Consider
- Which
Bufferread method matches each field? - Pay close attention to the data types, such as
UInt,Int,Float64/Double, andFloat32/Float. - Pay close attention to endianness.
BEmeans Big Endian. - The offset for each read is fixed by the protocol.
- Validate the input Buffer's length before attempting to parse it.
Challenge #2
Make retained-view behavior measurable. A small Buffer view can keep a much larger backing store alive even after the parent variable is gone.
Your Task
Write a program that demonstrates and measures retained backing-store memory. The script should perform two separate tests.
-
The view test
- Allocate a single, large
Buffer, for example 50 MiB. - In a loop, create a large number of small views, for example 100,000 views of 16 bytes each, from this large Buffer using
buf.subarray(). - Store these views in an array so they are not garbage collected.
- After the loop, log the memory usage using
process.memoryUsage(). Pay close attention toarrayBuffersandexternal.
- Allocate a single, large
-
The copy test
- Allocate a single, large
Bufferof the same size, 50 MiB. - In a loop, create a large number of small copies, for example 100,000 copies of 16 bytes each.
- Store these copies in an array.
- After the loop, make sure the original large Buffer is eligible for garbage collection and, if possible, invoke the GC.
- Log the memory usage again.
- Allocate a single, large
The Goal
Your script's output should show a clear difference in Buffer backing-store memory between the two tests. The view test's arrayBuffers and external values should stay slightly over 50 MiB because the small views keep the large backing store alive.
The copy test's arrayBuffers value should be much closer to the total copied payload size, though rss may not drop immediately because the native allocator can retain pages.
Things to Consider
- Run your script with the
--expose-gcflag so you can callglobal.gc(). This makes the results more stable. - Why are
arrayBuffersandexternalthe useful metrics for this experiment? - What do
rssandheapUsedrepresent? - The total size of the copies is
100,000 * 16 bytes = 1,600,000 bytes, about 1.53 MiB. Your result for the copy test should be in this range. - A helper function to format the byte counts into KiB/MiB will make your output easier to read.
Challenge #3
Now handle a variable-length protocol - a TCP stream carrying Type-Length-Value (TLV) messages.
Because the source is a TCP stream, data can arrive in arbitrary chunks. A single data event might contain multiple TLV messages, or only part of one. The parser therefore needs state. It must hold partial data until the rest of the message arrives in a later chunk.
The Protocol Specification
Each TLV message has a 3-byte header followed by a variable-length value.
| Offset (Bytes) | Length (Bytes) | Data Type | Description |
|---|---|---|---|
| 0 | 1 | UInt8 | Message Type, a number from 1-255 |
| 1-2 | 2 | UInt16BE | Length of the value part in bytes, 0-65535 |
[3, 3+L) | L | Buffer | The Value, or payload |
The payload range is half-open to match Buffer.subarray(start, end). It includes offset 3 and excludes offset 3 + L. For L = 5, the value occupies offsets 3 through 7.
Your Task
This challenge assumes you are comfortable with Node.js Transform streams. If you have not reached the Streams chapter yet, come back to this challenge after reading it.
Create a TlvParser class that extends stream.Transform. This class does the main parser work. It needs to -
- Maintain an internal Buffer for incomplete message chunks.
- Configure the readable side for object output with
super({ readableObjectMode: true }); the writable side should still accept byte chunks. - In its
_transformmethod, append incoming data to the internal Buffer. - Continuously try to parse complete TLV messages from its internal Buffer.
- If a full message is parsed,
pusha JavaScript object{ type, value }downstream. Thevalueshould be a copy of the payload Buffer. - Keep the remaining unparsed data in the internal Buffer for the next chunk.
Sample Data Stream
The data will arrive in chunks. Here is one example sequence -
const message1 = Buffer.from([
  0x01, 0x00, 0x05, 0x68, 0x65, 0x6c, 0x6c, 0x6f,
]); // Type 1, Length 5, Value "hello"

const message2 = Buffer.from([
  0x02, 0x00, 0x08, 0x67, 0x6f, 0x6f,
  0x64, 0x62, 0x79, 0x65, 0x21,
]); // Type 2, Length 8, Value "goodbye!"
Now split those messages across arbitrary chunks -
const chunk1 = message1.subarray(0, 4); // Contains header and one byte of value
const chunk2 = Buffer.concat([
  message1.subarray(4),
  message2.subarray(0, 6),
]); // Contains rest of msg1 and start of msg2
const chunk3 = message2.subarray(6); // Contains the rest of msg2
The Goal
When you pipe these chunks through an instance of your TlvParser, it should emit two data events, producing these objects in order -
{ type: 1, value: <Buffer 68 65 6c 6c 6f> }, wherevalueis "hello".{ type: 2, value: <Buffer 67 6f 6f 64 62 79 65 21> }, wherevalueis "goodbye!".
Things to Consider
- How will you manage your internal Buffer? For this exercise,
Buffer.concat()is acceptable. In production, bound retained data and avoid repeated concat patterns that grow quadratically. - Your parsing loop needs to check whether you have enough data for a header, which is 3 bytes, then read the length, and then check whether you have enough data for the full value.
- Once a message is parsed, how do you remove it from your internal Buffer so you can parse the next one?
buf.subarray()is the tool for this. - Why should the parser emit a copy of the value Buffer instead of a view into its internal Buffer? Think about what happens to the internal Buffer over time.
Challenge #4
Your video processing service constantly allocates and frees large 64 KiB Buffers. After running for a few days, it crashes with out-of-memory errors. To reduce that churn, implement a custom application-level Buffer pool.
Your Task
Create a BufferPool class that manages a fixed number of pre-allocated Buffers of a specific size.
The class must have the following features.
-
Constructor
(bufferSize, poolSize)- Takes the size of each Buffer, for example 65,536 bytes, and the number of Buffers to keep in the pool, for example 100.
- Pre-allocates all of these Buffers and stores them, perhaps in an array.
-
Method
get()- Returns an available Buffer when the pool has one.
- If the pool is empty, logs a warning and allocates a temporary Buffer of the correct size. This prevents the application from crashing but signals that the pool might be too small.
- Returns a
Buffer.
-
Method
release(buffer)- Takes a Buffer that was previously acquired from the pool.
- Returns the Buffer to the pool, making it available for the next
get()call. - It must reject Buffers that were not created by the pool.
- It must reject double releases.
- It should prevent temporary overflow Buffers from being added to the fixed pool.
-
Property
used- A getter that returns the number of Buffers currently checked out from the pool.
The Goal
Write the BufferPool class and then write a small simulation to test it. The simulation should -
- Create a pool.
- Get several Buffers from it, checking the
usedcount. - Release those Buffers back to the pool.
- Test the "pool empty" condition by trying to get more Buffers than the pool size.
- Test the
releaselogic for an "extra" Buffer that was created when the pool was empty.
Things to Consider
- What is the simplest data structure for available Buffers? An array with
push()andpop()is enough for this exercise. - Track ownership explicitly. A same-size
Bufferfrom somewhere else must not pass validation. ASetof pool-owned Buffers plus aSetof currently checked-out Buffers is enough for this exercise. - A regular JavaScript
BufferPoolinstance is not shared mutable state across worker threads. If workers need a common pool, use a main-thread lease protocol with message passing, or design aSharedArrayBufferallocator withAtomics. A plain array ofBufferobjects does not become thread-safe by being passed to workers. - Use
try...finallywhen using this pool so Buffers are released even if errors occur.
Challenge #5
You are interfacing with a legacy piece of hardware that mixes Big-Endian and Little-Endian byte orders within the same data packet. You could parse this with Buffer read methods, but this exercise uses DataView so each field's byte order is explicit.
The Protocol Specification
The packet is 16 bytes long.
| Offset (Bytes) | Length (Bytes) | Data Type | Endianness | Description |
|---|---|---|---|---|
| 0-1 | 2 | UInt16 | Big | Packet Signature, must be 0xCAFE |
| 2-5 | 4 | Int32 | Little | Device ID |
| 6-9 | 4 | Float32 | Big | Voltage Reading |
| 10 | 1 | UInt8 | N/A | Status Code |
| 11 | 1 | UInt8 | N/A | Checksum |
| 12-15 | 4 | UInt32 | Little | Uptime in seconds |
Your Task
Write a function parseLegacyPacket(buffer) that takes a 16-byte Buffer. Inside it, create a DataView over the Buffer's underlying ArrayBuffer using the Buffer's byteOffset and byteLength -
new DataView(buffer.buffer, buffer.byteOffset, buffer.byteLength);Use DataView methods such as getUint16, getInt32, and getFloat32 to parse the packet according to the specification. The final boolean argument controls endianness - true for little-endian, false for big-endian.
Sample Data
const legacyPacket = Buffer.from([
  0xca, 0xfe, // Packet signature (BE)
  0xad, 0xde, 0x00, 0x00, // Device ID: 57005 (LE)
  0x40, 0xa0, 0x00, 0x00, // Voltage: 5.0 (BE)
  0x01, // Status: 1 (OK)
  0xb5, // Checksum
  0x80, 0x51, 0x01, 0x00, // Uptime: 86400 (LE)
]);
The Goal
Your parseLegacyPacket(legacyPacket) function should return an object that looks like this -
{
  "signature": 51966,
  "deviceId": 57005,
  "voltage": 5,
  "status": 1,
  "checksum": 181,
  "uptime": 86400
}
Things to Consider
- How do you get the underlying
ArrayBufferfrom aBufferto create aDataView? EveryBufferinstance has a.bufferproperty. - Be careful with
byteOffset. A small Buffer may share a larger pooledArrayBuffer, so theDataViewshould usebuffer.byteOffsetandbuffer.byteLengtheven when the Buffer is not an explicit slice. - The third argument to
DataViewmethods is the endianness flag.false, or omitted, is Big-Endian.trueis Little-Endian. You will need to use both. - The parser should make every offset, width, and byte-order choice explicit.
Challenge #6 (Advanced)
This is an advanced, optional challenge. If you have not worked with Node.js worker threads, shared memory, or Atomics before, come back to it after the worker-threads material.
You have a latency-sensitive application where multiple worker threads need to increment a shared counter. Passing a message to the main thread for every increment would add per-increment messaging, scheduling, and cloning overhead. That is the wrong shape for a hot counter. The counter needs shared memory plus an atomic update operation.
Your Task
Write a script that demonstrates a thread-safe counter using a SharedArrayBuffer and Atomics.
-
Main Script (
main.js)- Create a
SharedArrayBufferlarge enough to hold one 32-bit integer, which is 4 bytes. - Create an
Int32Arrayview over it. - Initialize the counter at that memory location to 0.
- Create two
Workerthreads, passing theSharedArrayBufferto each of them. - Each worker will increment the counter a large number of times, for example 1 million.
- Wait for both workers to signal that they are finished.
- Read the final value from the
SharedArrayBufferusingAtomics.load()and print it. The final value should be the sum of all increments, for example 2 million.
- Create a
-
Worker Script (
worker.js)- Receive the
SharedArrayBuffervia a message. - Create its own
Int32Arrayview over the shared buffer. - In a tight loop, increment the shared counter using
Atomics.add(). This is the key to thread safety. - When the loop is done, send a "done" message back to the main thread.
- Receive the
The Goal
The final output on the main thread should be -
Final counter value: 2000000If you used a non-atomic operation like view[0]++, you would likely get a final value less than 2 million. That happens because each increment is a read-modify-write operation, and two workers can interleave those steps unless the operation is atomic.
Things to Consider
- This is the only challenge that requires two separate files.
SharedArrayBufferallows memory to be visible across threads.- Why is
Atomics.add(view, 0, 1)required instead ofview[0]++? Research what a "race condition" is in the context of a read-modify-write operation. - How does the main thread know when both workers are finished? You can use Promises to wait for the "done" message from each worker.
Promise.allis a good tool for this. - This is shared mutable state. The correctness edge is the
Atomicsoperation, not the typed-array assignment.
Buffer memory problems usually come from lifetime, not from the Buffer API alone. Retain views deliberately, measure rss, external, and arrayBuffers together, bound queues before traffic spikes turn into retained memory, and copy small regions when keeping a view would retain a much larger backing store.
Reuse Buffers only when ownership is explicit. Otherwise, a copy is often the safer optimization.